Overview ↑
Each year schools prepare a master schedule for the next academic school year. Since scheduling is an annual event, this guide was created to provide support with the Flex Scheduling process. Comprehensive scheduling documentation is also available: Secondary Flex Scheduling
Security ↑
Security permissions requirements can be found on the following article: Flex Scheduling - Security
Backups ↑
Always Backup after each process throughout the scheduling process. In addition, make a Backup whenever applying a "what if" scenario. There is no limitation on the number of Backups.
NOTE: Backup! Backup! And when in doubt...Backup Again!
Process Guide and Checklist ↑
| Scheduling Process | Scheduling Dashboard | Key Information |
| Scheduling Setup | A1 | Step One - Clear Out the SMS: The SMS Board needs to be initialized. On the Scheduling Setup page:
 If a new master schedule will be created for the next year, the SMS Table was created in Step One and is ready for scheduling. If a new master schedule will be created for the next year, the SMS Table was created in Step One and is ready for scheduling. |
| Backup | A* | Reminder: Make a Backup! |
| Courses | A2 | Update the Course Table (CRS) by adding any new course offerings and inactivating any courses that will no longer be used. |
| Course Request Packets | A3 | Create Course Requests Packets or update current Course Requests Packets with any changes. |
| Update Course Request Options | A5 | If using Online Course Requests, update course offerings. |
| Portal Options - Scheduling Tab | A6 | If using Online Course Requests, establish dates for grade level windows. Hide Scheduling Results from Parents and Students. Remove the "hide" feature when ready to share scheduling results with Parents and Students. |
| Bell Schedules | Bell schedules need to be in place for Flex Scheduling. Ensure that every needed bell schedule is listed in BSD.TY. Once BSD.TY is updated, add the Types to the Bell Scheduler page. Ensure each Bell Schedule used at the school is listed on the Bell Scheduler. Add any missing Bell Schedules using the Bell Schedule Details form. No need to fill out the time schedules for the bell schedules. The time schedules for each bell schedule are updated on the Flex Period. Once BSD.TY is updated, add the Types to the Bell Scheduler page. Ensure each Bell Schedule used at the school is listed on the Bell Scheduler. Add any missing Bell Schedules using the Bell Schedule Details form. No need to fill out the time schedules for the bell schedules. The time schedules for each bell schedule are updated on the Flex Period.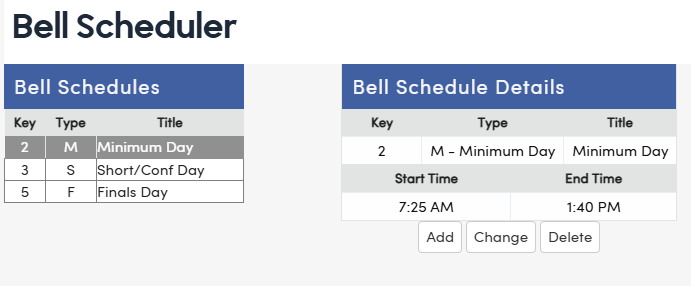 | |
| Flex Periods | A7 | Create a Flex Period for each period offered. If Flex Periods were auto created, ensure that all the periods needed for scheduling exist. Flex Periods need an assigned Academic Year, Short Title (typically P1, P2, P3, etc.), Description, Start Time, End Time, and Type (Standard is common - use Non-Conflict for pullout, ie: RSP, Music, etc.).  Update the Bell Schedule times on each period. For example, if the Bell Schedule is assigned on the Attendance Calendar (DAY), what time would the class meet? Update the Bell Schedule times on each period. For example, if the Bell Schedule is assigned on the Attendance Calendar (DAY), what time would the class meet? Note: When creating a new SMS, the process will automatically copy the previous Flex Periods and produce Flex Periods for the next school year. Note: When creating a new SMS, the process will automatically copy the previous Flex Periods and produce Flex Periods for the next school year. |
| Class Calendars | A8 | Create Class Calendars. Use the Copy Calendar and Mass Select Dates buttons to quickly produce the Class Calendars. If desired, an Aeries Admin can copy Class Calendars to multiple schools (all elementary schools). The Class Calendar denotes the days of the week that the class meets. Each Flex Period must have an assigned Class Calendar, to allow for emergency scheduling changes (natural disasters, lockdown, etc.).  When scheduling for next year, if the Board-approved attendance calendar has not be determined, use a "pseudo" start and end date for each Class Calendar, for example August 1st. After the rollover, when the Attendance Calendar (DAY) and Terms table (TRM) have been updated, the Class Calendars will also be automatically updated and display attendance information from the Attendance Calendar and Terms (TRM). Update the start and end dates on the Class Calendars to align with the Board-approved Attendance Calendar (DAY). When scheduling for next year, if the Board-approved attendance calendar has not be determined, use a "pseudo" start and end date for each Class Calendar, for example August 1st. After the rollover, when the Attendance Calendar (DAY) and Terms table (TRM) have been updated, the Class Calendars will also be automatically updated and display attendance information from the Attendance Calendar and Terms (TRM). Update the start and end dates on the Class Calendars to align with the Board-approved Attendance Calendar (DAY).Note: Class Calendars are not copied over annually and must be newly created each year. |
| Backup | A* | Reminder: Make a Backup! |
| Course Requests | B | Course Requests determine a student's projected coursework and must be in place if a school plans to use the scheduler to assign classes. There are several options for assigning course requests to students.
|
| Backup | B* | Reminder: Make a Backup! |
| Build the Scheduling Master Schedule | C | Using the SMS Board is the most efficient method of building a new Master Schedule. Multiple sections can be added to the Master Schedule at one time. When adding the sections, ensure that each section is assigned the corresponding Class Calendar. Sections can also be added, one at a time, using the Scheduling Master Schedule page. The Scheduling Master Schedule has a copy feature for replicating sections and then updating the Flex Period and Class Calendar. |
| Backup | C* | Reminder: Make a Backup! |
| Scheduling Tools: Class Links | Class Links (MST.CL) is a tool that can be used to "link" classes (sections) together. If students are scheduled into a specific set of classes, the sections can be grouped together by assigning the same class link value to each section. The scheduler honors the Class Links configurations when the mass scheduling process is run. Students placed in one section, will automatically be scheduled into any corresponding linked sections. In addition, Class Links are honored when scheduling on the Classes or Course Requests pages.
| |
| Backup | C* | Reminder: Make a Backup! |
| Scheduling Tools: Team and Course Groups | Team and Course Groups is another option for linking sections to ensure rotations. For Team and Course Groups, field values are created for the Team (MST.TM) and the Course Group (MST.CG) fields. After updating the Code Table for MST, these values will also become available in the Scheduling Master Schedule (SMS.TM) and (SMS.CG) dropdowns. The scheduler honors the Team and Course Groups configurations when the mass scheduling process is run.
| |
| Backup | C* | Reminder: Make a Backup! |
| Scheduling Tools: Scheduling Groups | Scheduling Groups is best used to support "Academies", "Houses", assigning a constant homeroom teacher for a student's tenure, etc. For Scheduling Groups, field values are created for the Master Schedule Scheduling Groups (MST.SG) field. After updating the Code Table for MST, the values will also become available in the Scheduling Master Schedule Scheduling Groups (SMS.SG) and Student Demographics Scheduling Groups (STU.SG) dropdowns. The scheduler honors the Scheduling Group configurations when the mass scheduling process is run.
| |
| Backup | C* | Reminder: Make a Backup! |
| Schedule All Students | D2 | Once Course Requests and scheduling tools have been applied, it's time to run the scheduler. The Schedule all Students page is used.
If any changes are made to the Master Schedule, Make a Backup with each change so that if the change worsens the scheduling results, the prior Master Schedule version can be restored. Options to try:
Continue running the schedule until the students scheduled percentage is acceptable.
|
| Backup | D* | Reminder: Make a Backup! |
| Copy SMS to MST | E1 | After the rollover and once the master schedule is solidified, it's time to rollover the Scheduling Master Schedule (SMS) to the Master Schedule (MST). After ensuring that a current Backup exists, navigate to the Copy Scheduling Results to SEC & MST. Run the process.
The Student Locator Cards Report (F12) can be run with various options to support student schedule distribution. The Student Class Schedule for All Students prints student schedules in alphabetical order. |