

Deleting Attendance during a Schedule Change
Scheduling Pre-Enrolled Students
Alternative Education Scheduling
Overview
The Classes page displays enrolled students and their current class schedules. The Edit mode allows for adding, deleting and changing courses and sections very quickly.
In Edit Mode, all sections of a selected course are immediately displayed to allow users to manually choose the selected section or click the Reschedule button to let the system handle choosing the best student schedule. Multiple sections listed for a single period are sorted based on available seats.
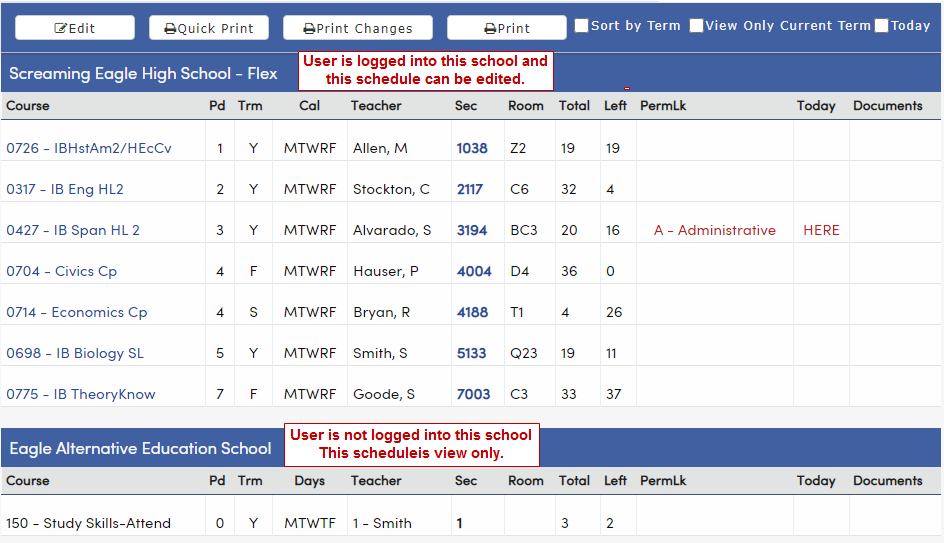
Sections are color coded for easy reference. The course ID and name, flex period, term, class calendar, teacher, section number, room, total number of students in the section, and the number of seats left are displayed. Under the Today column, HERE in red indicates the class that the student is currently attending, according to the Flex Period Start and End Time. This includes custom bell schedules (DAY.BS and the FTT table) where applicable.
Security ↑
Table | Permission | Description |
|---|---|---|
| Classes (SEC) | Read Insert Update Delete | View Class Schedule Add new class Update existing class Delete class |
| Attached Class Documents (CDC) | Read | View Class Documents |
| Course (CRS) | Read | View linked pages |
| MST | Read and Update | Override full Classes |
Viewing Classes ↑
Classes begins in read-only View mode, which provides a list view of the student's schedule.

Checking on the display option "Show Available Periods" will display the available flex period columns including the start and end times along with a graphical picture of the student's schedule.

The Edit button moves the form into Edit Mode, which is described in greater detail in Adding/Updating Classes below.
The total courses and total credits for each term are summarized at the top of the Classes page for each student. The same course is only counted once per term in the summary totals. The total credits come from the Master Schedule Credit field (MST.CR)
If a student is enrolled in two schools within the district, both schedules will be displayed. The two schedules will be labelled by school name. The current school, that the user is logged into, will be on top, with the other schedule below. Only the schedule in the school that is logged into will be editable. The schedule in the other school is for informational purposes only. To edit that schedule, a user must log into that school. In the example below, the user is logged into Screaming Eagle High School. The student has classes at Screaming Eagle and at the Eagle Alternative Education School. Only the classes at Screaming Eagle can be modified.
The school option "Allow Issue Credit on Classes / Course Attendance pages" is currently not supported in a Flex Scheduling school. The following alert message will display when the Issue Credit button is clicked.

Quick Print prints a PDF of the student's schedule. Print Changes will print all changes made to the student’s schedule, starting with the date selected. Print will print the student's schedule in formats other than PDF and/or for specific terms.
The checkboxes at the top right allow different views of the schedule: Sort by Term, View Only Current Term, or Today, a view of the schedule on the current day (based on the Class Calendar field for the sections in the student's schedule).

A guide to the graphical symbols used in the Classes page is provided below:
Symbol | Description |
 | The current section selected for the student |
 | The section in the Master Schedule is full |
 | A section in the Master Schedule is available and has room for more students |
If a student has a supplemental attendance session, it will display at the bottom of the page in the Supplemental Attendance Info section. Additionally, if applicable, the form provides indicators reflecting the student's graduation status, based upon the requirements set in the Graduation Requirements Table (REQ):

Adding/Updating Classes ↑
Click Edit to move the view into Edit Mode. Edit Mode allows for adding, deleting and changing courses and sections very quickly.
Date fields will display at the top of the form if Attendance and CAR have been initialized. The End Date: for dropped classes and Start Date: for new classes will display.
These Course Attendance Effective Dates indicate the exact dates when the student will start an added class or leave a dropped class. If appropriate, fill in an End Date for dropped classes and Start Date for added classes. The Start Date will default to the next valid school date and the End Date will default to the current date. Modify the dates if needed. For example, if a new student will be in attendance at school and will start in the new classes today, change the Start Date to today's date.
Courses can be selected in several different ways in Edit Mode.
- Adding a course to the Course/Current Class field
- Adding a Course Request Packet
- Using the View MST button
1. Type the course number or the course title (partial input is supported) into the Course/Current Class field. A drop-down of courses matching the input will appear. Click on a course, and sections of that course in the Master Schedule will appear under the period when they are offered.

2. To add a course using Course Request Packets, click on the CrsReqPack button. Filter by grade level and choose one or more Course Request Packets to add. See Add a Course Request Packet for more information.

3. Click on the View MST button to display the Master Schedule in grid form:

Click on the filter  icon by any of the headers on the View MST display. On the filter pop-up, fill in the search term (partial input is supported) and click Filter to only show sections that match the search term.
Click on the green plus sign  to add the course associated with that section to the student's Classes (the student will be scheduled into that section).
Click on the pin icon at top right  of the MST pop-up to "dock" the MST below the Classes form. After docking, the top right of the View MST's header bar will display more icons to allow further actions. If the pop-out icon
  is clicked, the View MST window will move to a separate browser window. Clicking the pin icon
  will un-dock the View MST window. Refresh
  will clear any filters set in the View MST window. For more detailed information, see View MST.
Linked Sections ↑
Sections with a linked value in MST.CL will display with a chain icon under the section number column. Clicking on the plus symbol to add a section, will automatically include the second linked section during the add process.

The value of the field will display at the end of the column labeled ClsLink#.

Symbol | Description |
 | Click to place the course associated with that section onto the student's schedule work space |
 | Filter the MST to only see sections in a certain period, course, teacher, etc. |
 | Click to dock the MST under the student's schedule |
 | Un-dock the MST |
 or or  | Pop-out the MST to a separate browser window |
 or or  | Clear filters in the MST |
 or or | Close the MST pop up |
 | Indicates a section as being linked to another section via the Class Link field in MST |
Once courses have been added to the list, Edit Mode will provide a graphical display of sections for each course. Edit Mode is a temporary work space where sections can be chosen for the student's schedule.

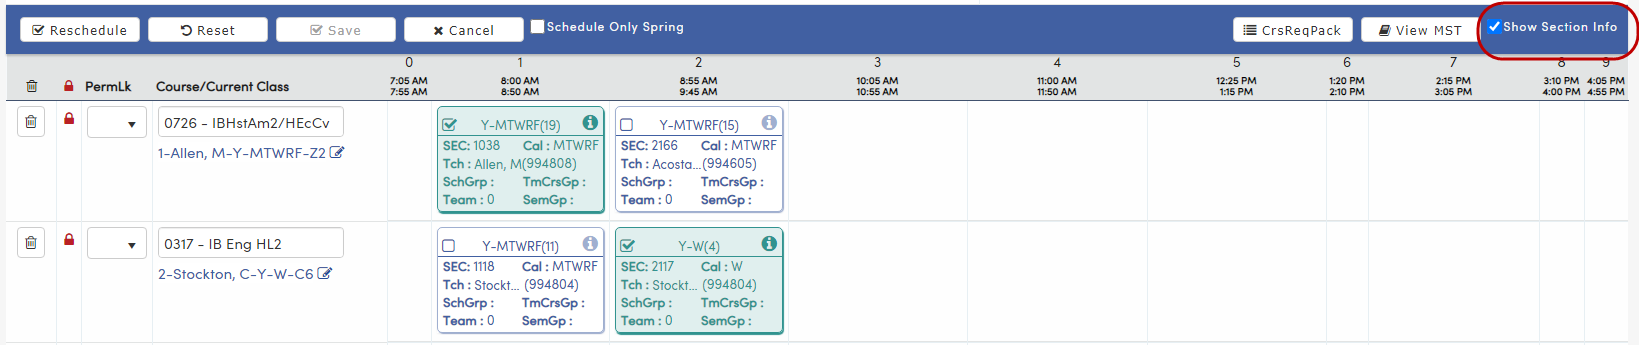
Each section's "tile" displays the Term, the total number of students, and the days that the section meets.
Hover the mouse over the "information" circle  on each section to see a pop-up containing the section number, the teacher name, the block number, the grade range, scheduling group fields, the maximum number of students, the total number of students in the class, and warnings.
Alternatively, clicking the Show Section Info checkbox will display more information for each section on the workspace:
The same color-coding from View Mode applies to the sections in Edit Mode: blue sections are available, red sections are full.
In Edit Mode, the form displays two rows of sections. If more sections are available, a gray bar and a chevron symbol
 will be shown under the two rows of sections. Click on the gray bar to see more sections for that course.
| Symbol | Description |
 | The current section selected for the student |
 | The section in the Master Schedule is full |
 | A section in the Master Schedule is available and has room for more students |
 | Will delete a course from the list |
 | Mouse hover will display information about the section |
 | Click to see more sections of the course |
 | Section is locked |
 | Section is unlocked |
 | Click to add a course/section by section number |
Another option for adding a course and section is to click the Add Section icon located under the course information box in the Course/CurrentClass column. The Section: pop-up will appear:

After a section number is typed into the pop-up and Enter is pressed on the keyboard, the section's course will be added to the Edit Mode workspace and the student will be scheduled into that section.
Now that a list of courses and their associated sections are in place, sections can be hand selected or the Reschedule button can be used. To allow Aeries to schedule the student, click Reschedule. The student will be placed into sections based on the availability of seats.
To hand select a section, click on the available section. The section will "check" and turn green to indicate that it has been chosen for the student's schedule. Any checked section will automatically become locked and a lock icon

will appear on that row. Click the lock icon to toggle between locked and un-locked. The top lock icon in the header row can be clicked to toggle the entire schedule locked and un-locked.
To schedule students for Spring sections only, check the Schedule Only Spring checkbox:

Class sections that do not meet during the Spring term will be grayed out and Edit Mode will not allow those sections to be selected. If Reschedule is clicked, the grayed out sections will not be scheduled.
Click on the Save button to save the scheduled sections. The student's records in the SEC and CAR table are not affected until the Save button has been clicked.
NOTE: The Save button must be clicked to save the selected sections.
Reset will abandon any changes made and go back to the original schedule, but remain in Edit Mode. Once a student's schedule is completed, click Save to save the schedule and return to View Mode. Cancel will abandon any changes made in Edit Mode and return to View Mode.
If you want to delete a course from the Edit Mode workspace, click the Trash button on the far left of the course.
Perm Lock ↑
A scheduled section can also be locked by choosing a code from the PermLk field dropdown.
PermLk Codes can be added to the code table. Update the SSS table code and PL field:

NOTE: A blank code should be added (as shown above with the description "Not Locked"). The blank code in SSS.PL will be the default value, and will allow a PermLk to be removed.
Changing Existing Schedules ↑
To quickly change a student's class, Edit Mode will allow selecting another section that is available. Before changing a student's schedule, the End Date and Start Dates at the top of the page need to be verified and modified if needed.
NOTE: End Date and Start Dates need to be verified and modified to ensure correct Course Attendance (CAR) records.
The student below is scheduled in Flex Period 1 Spanish I section. To move the student to another available section for that course, click on a section in the same row.

Flex Period 0 section is selected. The period will turn green and the Save button is now highlighted in pink after the section is selected. The schedule change will not be saved until the Save button is clicked.

The Classes page will now display the Flex Period 0 section for the student.

Course Attendance (CAR) will now also reflect the schedule change.

Deleting Attendance during a Schedule Change ↑
When attendance is submitted in a Flex period school, the codes are stored in the CAT table and are linked by the section number. When a class is removed from a student's schedule and period attendance records exist for the section being removed, it is important to remove any attendance after the course attendance end date, otherwise orphaned CAT records will exist.
On the Classes page, when the user deletes a class section where future CAT records exist after the Course Attendance End Date (CAR.ED), the user will be prompted with a notification to Delete Att Records. The section number(s) will display in the alert for any section that has CAT records after the course attendance end date that have the same section number. If there are no attendance records that need deleting, the alert will not display during the schedule change process.
To avoid leaving orphaned attendance in the system for the class period, it is suggested that the user selects Yes to delete any existing attendance records after the class has ended. Selecting No will not delete the CAT records linked to the class being removed that have a date after the CAR end date and as a result, the records will remain in Aeries as orphaned attendance records.

Selecting No to Delete Att Records will result in a red audit error message to display at the top of the student's schedule. These errors can also be identified by printing the Attendance Audit Listing - code AJ.

NOTE: Permission to delete the attendance record during a schedule change is inherited by the SEC permission. If a user has permission to delete the class, the user will inherit the necessary permissions needed to adjust CAR automatically and delete CAT records when the user selects "Yes" for Delete ATT Records popup alert. This special permission is only applied to this schedule change process. It is not necessary to grant the user any special permission to the ATT table in order to delete the attendance record as a result of the Delete ATT Records alert.
Time Range ↑
The Time Range low and high values replace the Period Range feature for non-Flex schools, and the new fields on this page apply only to the Classes page. The Reschedule button will honor the Classes Low Time and Classes High Time when doing walk-in scheduling. A student will NOT be scheduled into a section if that section's Flex period meets outside the time range set for the student.
To add, edit, or remove the times, click the Edit button, modify the Time Range, then click the Save button.

Below are ways that the scheduling process honors the low and high time values:
- Honors the Crs Req Low Time and Crs Req High Time when scheduling students on the Course Request page or the Schedule All Students page.
- For non-conflict Flex periods, a student will only be scheduled into a section if the period overlaps the time range.
- For regular Flex periods, a student will only be scheduled into a section if the period is within the time range.
- A NULL Low Time is treated as beginning of day / midnight.
- A NULL High Time is treated as end of day / midnight.
- If both Low Time and High Time are NULL, that is treated as all-day, and no sections will have a conflict based on the time range.
Scheduling Pre-Enrolled Students ↑
The Classes New page will not schedule pre-enrolled students using the Reschedule button (choosing sections automatically). However, courses and/or sections can be added to a pre-enrolled student's schedule and the sections may be chosen by hand. When the Edit button is pressed and Classes New moves into Edit mode, a warning will be displayed.
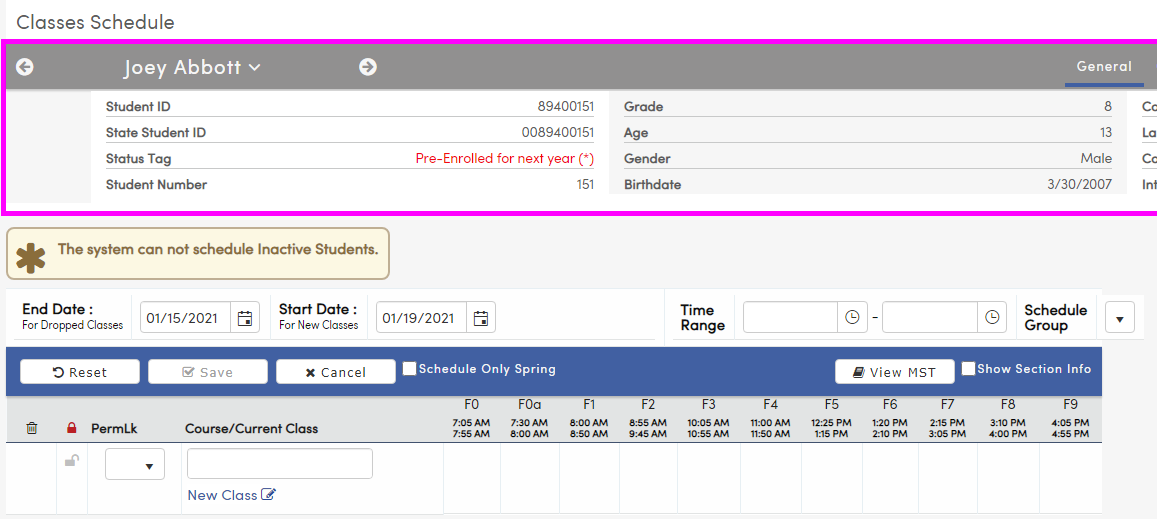
Hand-entering of courses into the Course/CurrentClass field, typing section numbers into the New Class field, and/or adding sections using View MST can proceed as usual. The Reschedule button will not be displayed. If courses are added, the appropriate section tiles will have to be selected before saving the schedule.
Alternative Education Scheduling ↑
If Alternative Education Scheduling is enabled, a warning will appear under the list of courses in Edit Mode:

Additionally, in View Mode, a pencil icon will display next to each course, indicating that the course IDs can be changed. For more information, see Alternative Education Scheduling.
District Level Scheduling ↑
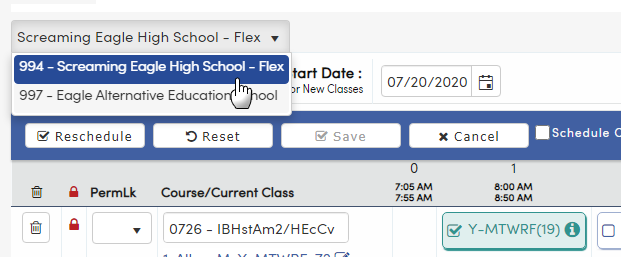
At the district level, if a student is enrolled in two schools, a dropdown will allow a school to be selected. Press the Edit button to move the display into Edit Mode. The Edit Mode grid will display the student's schedule for the currently selected school. Choose the other school from the dropdown to display the other school's schedule.
Impact of Schedule Changes ↑
As mentioned previously in this document, the Start Date and End Date (as recorded in CAR) must be correctly maintained. Incorrect dates may create issues for other processes within Aeries. For example, if a student is dropped from a section too early, the teacher in the "old" section will no longer be able to take their attendance for that student and/or give the student assignments or grades in the Gradebook. Incorrect attendance reports may be generated. Incorrect parent notifications may be sent. Most importantly, incorrect schedule changes can mean that school personnel, who rely on Aeries to locate the student, may not be able to find the student when they need to. The student Attendance page in a Flex Scheduling schools also relies on CAR Start and End Dates. As classes change, the headers details the class information also changes on those dates as reflected in CAR.